- Open Registry editor [by typing regedit in RUN dialog box and press Enter].
- Now expand "HKEY_CLASSES_ROOT" key.
- Search for the file type you want to remove from "New" menu, e.g. for removing "Rich Text Document (.rtf)" file type look for .rtf key under HKEY_CLASSES_ROOT key.
- Now Expand it and delete the ShellNew key present under it.
- That's it. The file type will no longer be available under the "New" menu.
Friday, April 15, 2016
To Remove an Item from "New" Context Menu

How to Add Items to “New” Context Menu in Windows
- Type regedit in RUN dialog box and press Enter. It'll open Registry Editor.
- Now expand "HKEY_CLASSES_ROOT" key.
- Now look for a sub-key having same name as the file type which you want to add in "New" menu. e.g. if you want to add JS file type to "New" menu, look for .js key under HKEY_CLASSES_ROOT key.
- Now right-click on it and select "New -> Key" option. It'll create a new key, give it name ShellNew
- Now in right-side pane, right-click and select "New -> String Value". Give it a name NullFile and press Enter.
- Hurray!! You done it. Now you will have a new JavaScript file option in context menu.
Wednesday, January 13, 2016
AVG Internet Security 2016/2015/2014 Multilingual Working Serials..
Below, i m giving you 20+ license numbers working for multilingual AVG Internet Security 2016/2015/2014 on both Windows 32-bit and 64-bit platforms.
License Info
- Product Name: AVG Internet Security 2016 (Full, 145000 computers)
- License Expires: Wednesday, February 28, 2018
- 8MEH-RGM33-K474L-6FGRR-8HHTL-UEMBR-ACED
- 8MEH-R2CML-SS7FW-MOXFR-TRU8V-3EMBR-ACED
- 8MEH-R336M-QDYTV-ECNOR-6VWKU-CEMBR-ACED
- 8MEH-R3VBQ-DC433-3FPOA-YADFU-NEMBR-ACED
- 8MEH-R3VBQ-DC433-3FPOA-YFE9U-NEMBR-ACED
- 8MEH-R6633-YP39H-YCNSR-H7BQT-EEMBR-ACED
- 8MEH-R6633-YP39H-YCNSR-HHW2U-EEMBR-ACED
- 8MEH-RWEYH-SXKCN-6H9FR-39X22-6EMBR-ACED
- 8MEH-RD8B8-2GXG3-Z6YQA-EKSSM-GEMBR-ACED
- 8MEH-RFOD4-SXWR8-JRTQA-JKHAM-WEMBR-ACED
- 8MEH-RNZLL-2Y4QX-79PPA-MPLRF-AEMBR-ACED
- 8MEH-RR6GC-KLJJD-S7DBA-NWGU9-EEMBR-ACED
- 8MEH-RMXLW-HN44A-BABPA-S3LRF-PEMBR-ACED
- 8MEH-RWEYH-SGLCN-6H9FR-34S98-6EMBR-ACED
- 8MEH-R2CML-SS7FW-MOXFR-THMOW-3EMBR-ACED
- 8MEH-RRX6F-OD26X-H9ZCR-XBTF3-PEMBR-ACED
- 8MEH-RWEYH-SGLCN-6H9FR-3FDL4-6EMBR-ACED
- 8MEH-RU7JQ-ACDRM-MQEPR-GGFT3-FEMBR-ACED
- 8MEH-RK82S-PWO92-C33BA-Q7RAA-GEMBR-ACED
- 8MEH-RWVTJ-WWADY-S899R-N2ON9-NEMBR-ACED
- 8MEH-RTW3W-YQLQ3-KUK8A-RNRN7-OEMBR-ACED
- 8MEH-RF3MY-BZ7CJ-9LUAR-SPR9J-CEMBR-ACED
- 8MEH-RCKOP-BP9KK-YW8EA-67H7O-SEMBR-ACED
- 8MEH-R6633-YP39H-YCNSR-HHW2U-EEMBR-ACED
- 8MEH-RQEZT-BQJG3-E64FA-9YDWD-6EMBR-ACED
- 8MEH-RF22Z-ANGGS-QDWMR-27TAN-BEMBR-ACED
- 8MEH-RS47Y-82HT8-GONVA-BCCCZ-DEMBR-ACED
- 8MEH-RXYFD-JUV72-8922R-FTDO8-QEMBR-ACED
- 8MEH-RGM33-K474L-6FGRR-8QEFN-UEMBR-ACED
- 8MEH-R6BFE-HWUHF-DPNDA-VFUWX-2EMBR-ACED
- 8MEH-RXYFD-JUV72-8922R-FTDO8-QEMBR-ACED
- 8MEH-RFR8J-PTS8Q-92ATA-ORC6Q-JEMBR-ACED
This work/post/keys are licensed under a Creative Commons Attribution-NonCommercial-ShareAlike 4.0 International License
AVG Internet Security 2015 Working Serial Keys are Here
Updated KEYS
8MEH-R78BH-EYG8L-MLMVA-Z2RWY-GEMBR-ACED
8MEH-R9Q3V-ZHN2T-92KCR-AYPHR-YEMBR-ACED
8MEH-RYH2W-SAT6N-H2HGA-WPAXZ-9EMBR-ACED
8MEH-RFOD4-SXWR8-JRTQA-J66DN-WEMBR-ACED
8MEH-RYGA4-P8CR8-WQV7A-7ZMJ4-8EMBR-ACED
8MEH-RYH2W-SAT6N-H2HGA-W2AS2-9EMBR-ACED
8MEH-RFOD4-SXWR8-JRTQA-J66DN-WEMBR-ACED
8MEH-RYGA4-P8CR8-WQV7A-7ZMJ4-8EMBR-ACED
8MEH-REJA9-D2M3S-337LR-DAXEM-REMBR-ACED
8MEH-RBG6H-9C2PW-G499A-LPHAP-8EMBR-ACED
8MEH-RRX6F-OD26X-H9ZCR-XQDX9-PEMBR-ACED
8MEH-RCKOP-BP9KK-YW8EA-6OKSL-SEMBR-ACED
8MEH-R78BH-EYG8L-MLMVA-Z2RWY-GEMBR-ACED
8MEH-R9Q3V-ZHN2T-92KCR-AYPHR-YEMBR-ACED
8MEH-RYH2W-SAT6N-H2HGA-WPAXZ-9EMBR-ACED
8MEH-RG9B7-BG7WC-PXRCR-JF3UP-HEMBR-ACED
8MEH-RG9B7-BG7WC-PXRCR-JF3UP-HEMBR-ACED
Serial KEYS
8MEH-R78BH-EYG8L-MLMVA-Z2RWY-GEMBR-ACED
8MEH-R9Q3V-ZHN2T-92KCR-AYPHR-YEMBR-ACED
8MEH-RYH2W-SAT6N-H2HGA-WPAXZ-9EMBR-ACED
8MEH-RFOD4-SXWR8-JRTQA-J66DN-WEMBR-ACED
8MEH-RYGA4-P8CR8-WQV7A-7ZMJ4-8EMBR-ACED
8MEH-RYH2W-SAT6N-H2HGA-W2AS2-9EMBR-ACED
8MEH-RFOD4-SXWR8-JRTQA-J66DN-WEMBR-ACED
8MEH-RYGA4-P8CR8-WQV7A-7ZMJ4-8EMBR-ACED
8MEH-REJA9-D2M3S-337LR-DAXEM-REMBR-ACED
8MEH-RBG6H-9C2PW-G499A-LPHAP-8EMBR-ACED
8MEH-RRX6F-OD26X-H9ZCR-XQDX9-PEMBR-ACED
8MEH-RCKOP-BP9KK-YW8EA-6OKSL-SEMBR-ACED
8MEH-R78BH-EYG8L-MLMVA-Z2RWY-GEMBR-ACED
8MEH-R9Q3V-ZHN2T-92KCR-AYPHR-YEMBR-ACED
8MEH-RYH2W-SAT6N-H2HGA-WPAXZ-9EMBR-ACED
8MEH-RG9B7-BG7WC-PXRCR-JF3UP-HEMBR-ACED
8MEH-RG9B7-BG7WC-PXRCR-JF3UP-HEMBR-ACED
Serial KEYS
8MEH-RJR4R-7FDJ6-NL3DA-CRXQC-JEMBR-ACED
8MEH-RXYFD-JDY72-8922R-FGLP8-QEMBR-ACED
8MEH-RYH2W-SRS6N-H2HGA-WCDTZ-9EMBR-ACED
8MEH-RQEZT-B9MG3-E64FA-99LLH-6EMBR-ACED
8MEH-RTN2Z-UUKMK-6RWGA-AAM82-VEMBR-ACED
8MEH-RB32G-U868U-TRLQR-B68SM-CEMBR-ACED
8MEH-RRX6F-OU36X-H9ZCR-XARDZ-PEMBR-ACED
8MEH-RAJC2-OLO77-KRRQA-HLSNJ-REMBR-ACED
8MEH-RWEYH-SXKCN-6H9FR-39X22-6EMBR-ACED
8MEH-RJR4R-7FDJ6-NL3DA-CGK2C-JEMBR-ACED
8MEH-RQX93-WH4KW-BE2FR-QDQ4B-PEMBR-ACED
8MEH-RNXBD-G4VHF-BSLSR-Z9C6C-PEMBR-ACED
8MEH-R2CML-SS7FW-MOXFR-TVC9T-3EMBR-ACED
8MEH-RFR8J-PTS8Q-92ATA-O4WHO-JEMBR-ACED
8MEH-RPDWL-THRLY-O8Z3R-4H3OA-4EMBR-ACED
8MEH-RCB97-4HRT9-P4RRR-RRFOP-2EMBR-ACED
Wednesday, December 23, 2015
Enable Administrator account in Windows 7 or later versions
Yes! It's possible.
The biggest mystery finally revealed. We can enable the administrator account in any version of windows. You might be wondering sometime that even your account is already an admin account, why your pc asks/prompts you to run a program as admin. This is because every pc has a hidden administrator account, and only that particular account has the full permission to do any thing.
So here you go-
To enable the administrator account :
1. Open command prompt as Administrator.
a. To do so you can right click on the cmd icon in start menu and select Run as Admin.
2. Type the following command on the command prompt:
net user administrator /active:yes
and press enter key. A message will appear saying Command competed successfully.
and you are done, go back to logon screen and you will have a Administrator account.
3. To switch it off back again go to command prompt. and type the following command.
net user administrator /active:no
The biggest mystery finally revealed. We can enable the administrator account in any version of windows. You might be wondering sometime that even your account is already an admin account, why your pc asks/prompts you to run a program as admin. This is because every pc has a hidden administrator account, and only that particular account has the full permission to do any thing.
So here you go-
To enable the administrator account :
1. Open command prompt as Administrator.
a. To do so you can right click on the cmd icon in start menu and select Run as Admin.
2. Type the following command on the command prompt:
net user administrator /active:yes
and press enter key. A message will appear saying Command competed successfully.
and you are done, go back to logon screen and you will have a Administrator account.
3. To switch it off back again go to command prompt. and type the following command.
net user administrator /active:no
Wednesday, October 15, 2014
Avast 2013 / 2014 free Edition lifetime License
1. Download Avast from Home Site [You can also download from here. ]
2. Install your new downloaded file.
3. Put Avast free Edition 2013 / 2014 working lifetime license. to activate
W9740570R9942A0910-8NB2E62T
4. Enjoy....
AVG Internet Security 2014 Working Keys
AVG Internet Security 2014 Working Keys till 2018:-
Disconnet your internet Connection before you go..
8MEH-RF3MY-BZ7CJ-9LUAR-ST99N-CEMBR-ACED
8MEH-RU7JQ-ACDRM-MQEPR-G3S23-FEMBR-ACED
8MEH-RREY3-L2LQA-LUMOR-UJXN3-6EMBR-ACED
8MEH-RNZLL-2Y4QX-79PPA-MMOKE-AEMBR-ACED
8MEH-RXYFD-JUV72-8922R-F283Z-QEMBR-ACED
8MEH-RF3MY-BZGDJ-9LUAR-SW7LQ-CEMBR-ACED
8MEH-RGM33-K4G3L-6FGRR-8BQML-UEMBR-ACED
8MEH-RF22Z-AN7HS-QDWMR-2DZ7M-BEMBR-ACED
8MEH-RF7RF-MRFKO-EWOVA-UMZQQ-FEMBR-ACED
8MEH-RCFXA-ZD2JS-8ROGA-GJDDO-7EMBR-ACED
8MEH-R6O2P-VYTYS-BAYWR-C6AQV-WEMBR-ACED
8MEH-RPTGT-KMXM7-EEEVR-KS8AC-LEMBR-ACED
8MEH-RYGA4-P82S8-WQV7A-78WK8-8EMBR-ACED
8MEH-RB32G-UPE9U-TRLQR-BXB9O-CEMBR-ACED
8MEH-RFR8J-PTL9Q-92ATA-OJEZN-JEMBR-ACED
8MEH-RFR8J-PTL9Q-92ATA-OGP3L-JEMBR-ACED
8MEH-R9Q3V-ZHYZT-92KCR-ATN4W-YEMBR-ACED
8MEH-RFR8J-PTL9Q-92ATA-OCPAN-JEMBR-ACED
8MEH-RJXR4-2CTXP-2GB3A-DUE4A-PEMBR-ACED
Disconnet your internet Connection before you go..
Cool Windows 8 [v.8.1] facts you should know
1. You Can Shut Down in Two Clicks
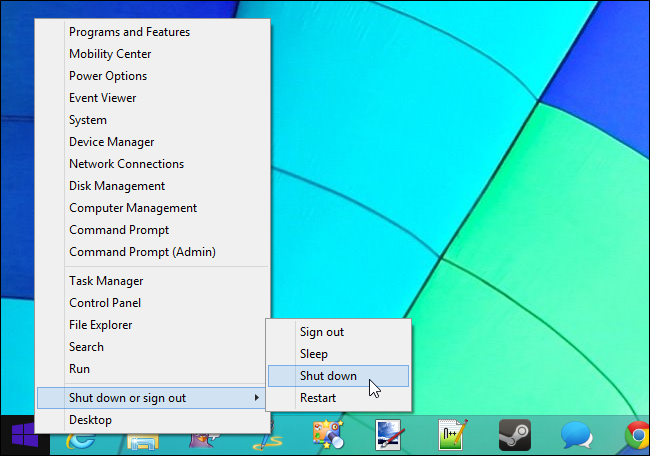
Press Windows Key + X or right-click the Start button to open the power user menu. This menu contains shortcuts with quick access to commonly used options like the Control Panel, Task Manager, and File Explorer.
2. Show Administrative Tools

The system tools found in the Windows Administrative Tools folder — applications like the Task Scheduler, Event Viewer, Services, and Computer Management tools — are normally hidden. They won’t appear in your All apps list and you won’t be able to find them by searching your installed applications, either. If you need them, head to the Start screen, press Windows Key + C, select Settings, select Tiles, and enable the Show administrative tools option on the Tiles pane.
3. Windows To Go

Of the entire list here, this is one feature that offers the most convenience to users. Windows To Go allows users to make a copy of their OS complete with their settings, wallpapers, files and even apps, into a USB/Pen drive. Plugged it into another computer with Windows 8 already installed, and you can boot up the PC and make it look exactly alike the OS you normally use, with all settings intact.
4. Windows Live Syncing

Similar to Windows To Go, the new Windows 8 will provide Windows Live syncing, such that users can login on any Windows 8 PC with ‘Live ID’ and get back their own personalized settings on it. The desktop will look the same every time the user login on a PC with their Windows Live account. Migrating to a new PC is probably made easier when the user has all the essential settings synced.
5. Built-In Antivirus

Windows 8 finally includes an integrated antivirus. The antivirus is named Windows Defender, although anyone who has used the free Microsoft Security Essentials will recognize the interface immediately. In Windows 8 Microsoft Security Essentials just has been renamed to Windows Defender.
Press Windows Key + X or right-click the Start button to open the power user menu. This menu contains shortcuts with quick access to commonly used options like the Control Panel, Task Manager, and File Explorer.
2. Show Administrative Tools
The system tools found in the Windows Administrative Tools folder — applications like the Task Scheduler, Event Viewer, Services, and Computer Management tools — are normally hidden. They won’t appear in your All apps list and you won’t be able to find them by searching your installed applications, either. If you need them, head to the Start screen, press Windows Key + C, select Settings, select Tiles, and enable the Show administrative tools option on the Tiles pane.
3. Windows To Go
Of the entire list here, this is one feature that offers the most convenience to users. Windows To Go allows users to make a copy of their OS complete with their settings, wallpapers, files and even apps, into a USB/Pen drive. Plugged it into another computer with Windows 8 already installed, and you can boot up the PC and make it look exactly alike the OS you normally use, with all settings intact.
4. Windows Live Syncing
Similar to Windows To Go, the new Windows 8 will provide Windows Live syncing, such that users can login on any Windows 8 PC with ‘Live ID’ and get back their own personalized settings on it. The desktop will look the same every time the user login on a PC with their Windows Live account. Migrating to a new PC is probably made easier when the user has all the essential settings synced.
5. Built-In Antivirus
Cool Win 7 facts you should know..
1. Useful Keyboard Shortcuts
Using the mouse, you can drag-n-dock windows to either side of the screen, or drag it to the top to maximize it. These keyboard shortcuts are even faster:
Win+Left Arrow and Win+Right Arrow -> Dock the window to the left and right side of the screen
Win+Up Arrow and Win+Down Arrow -> Maximize and restore/minimize
Win+M -> minimizes everything
Alt+Up, Alt+Left Arrow, Alt+Right Arrow ->
Navigate to parent folder, or browse Back and Forward through folders in Explorer
Win+Home -> Minimizes/restores all open windows except the active window
Alt+Win+# -> Accesses the Jump List of program number ‘#’ on the taskbar.
2. Rearrange System Tray Icons
You can rearrange icons on the taskbar as you wish and start new (or switch to running) instances of the first ten taskbar programs using Win+1, Win+2, and so on. The cool thing is you can also rearrange system tray icons. Reorder them on the tray or move them outside or back in the tray. Take control of what you want to always keep an eye on, and from which apps you’ll require notifications.
3. Add Any Folder to Favorites

You can add any library or folder to the Favorites section in Windows Explorer. To add a folder, navigate to it in Explorer, right-click Favorites in the left navigation pane, and select Add current location to Favorites. Now you get quick access to your favorite folders in all File->Save As dialogs!
4. Create Keyboard Shortcuts for Programs

You can create keyboard shortcuts for any program in Windows 7. Right-click the program icon and select Properties. Select the Shortcut tab, click in Shortcut key, to set the keyboard shortcut for that program.
5. Open Command Prompt in Any Folder

Miss the "Open Command Window Here" Windows XP power toy? Press "Shift" when right-clicking on a folder to get that option in the context menu. This also works on the desktop. No power toy required!
6. View Expanded ‘Send To’ Menu
Press Shift when right-clicking on a folder to get an expanded Send To menu.
7. Customize the Power Button

Change the default Shutdown power button to Hibernate. Right-click on Start, select Properties, and choose the Power button action that you use the most (Stand by, Hibernate Shut down, Restart whatever you want).
8. Search Internet from the Start Menu

Enable Internet search from the Start Menu using your default browser. Run GPEDIT.MSC from the Start Menu search box to start the Group Policy Editor. In the left pane, go to User Configuration->Administrative Templates->Start Menu and Taskbar. In the right pane, right-click to Edit and Enable Add Search Internet link to Start Menu.

9. Add Videos to Start Menu

Windows 7 does not have a link to your videos on the Start Menu by default. To add a link to your videos on the Start Menu, right-click Start, select Properties, click on Customize. In the Videos section at the bottom, choose Display as a link.
10. Send information to tech support

The next time you find yourself trying to describe a complicated computer problem to a friend or tech support, give Problem Steps Recorder a try. You can record a series of screen shots, add notes, and email them directly to whoever is helping you. Do you Know how to open it???
Here is how to Open Problem Steps Recorder.
Click on the Start button, and then type psr. In the list of results, click psr.
Click Start Record. On your computer, go through the steps on your computer to reproduce the problem. You can pause the recording at any time, and then resume it later.
Click Stop Record.
In the Save As dialog box, type a name for the file, and then click Save (the file is saved with the .zip file name extension).
To view the record of the steps you recorded, open the .zip file you just saved, and then double-click the file. The document will open in your browser.
Using the mouse, you can drag-n-dock windows to either side of the screen, or drag it to the top to maximize it. These keyboard shortcuts are even faster:
Win+Left Arrow and Win+Right Arrow -> Dock the window to the left and right side of the screen
Win+Up Arrow and Win+Down Arrow -> Maximize and restore/minimize
Win+M -> minimizes everything
Alt+Up, Alt+Left Arrow, Alt+Right Arrow ->
Navigate to parent folder, or browse Back and Forward through folders in Explorer
Win+Home -> Minimizes/restores all open windows except the active window
Alt+Win+# -> Accesses the Jump List of program number ‘#’ on the taskbar.
2. Rearrange System Tray Icons
 |
3. Add Any Folder to Favorites
You can add any library or folder to the Favorites section in Windows Explorer. To add a folder, navigate to it in Explorer, right-click Favorites in the left navigation pane, and select Add current location to Favorites. Now you get quick access to your favorite folders in all File->Save As dialogs!
4. Create Keyboard Shortcuts for Programs
You can create keyboard shortcuts for any program in Windows 7. Right-click the program icon and select Properties. Select the Shortcut tab, click in Shortcut key, to set the keyboard shortcut for that program.
5. Open Command Prompt in Any Folder
Miss the "Open Command Window Here" Windows XP power toy? Press "Shift" when right-clicking on a folder to get that option in the context menu. This also works on the desktop. No power toy required!
6. View Expanded ‘Send To’ Menu
Press Shift when right-clicking on a folder to get an expanded Send To menu.
[Image preview provided above.]
7. Customize the Power Button
Change the default Shutdown power button to Hibernate. Right-click on Start, select Properties, and choose the Power button action that you use the most (Stand by, Hibernate Shut down, Restart whatever you want).
8. Search Internet from the Start Menu
Enable Internet search from the Start Menu using your default browser. Run GPEDIT.MSC from the Start Menu search box to start the Group Policy Editor. In the left pane, go to User Configuration->Administrative Templates->Start Menu and Taskbar. In the right pane, right-click to Edit and Enable Add Search Internet link to Start Menu.
9. Add Videos to Start Menu
Windows 7 does not have a link to your videos on the Start Menu by default. To add a link to your videos on the Start Menu, right-click Start, select Properties, click on Customize. In the Videos section at the bottom, choose Display as a link.
10. Send information to tech support
The next time you find yourself trying to describe a complicated computer problem to a friend or tech support, give Problem Steps Recorder a try. You can record a series of screen shots, add notes, and email them directly to whoever is helping you. Do you Know how to open it???
Here is how to Open Problem Steps Recorder.
Click on the Start button, and then type psr. In the list of results, click psr.
Click Start Record. On your computer, go through the steps on your computer to reproduce the problem. You can pause the recording at any time, and then resume it later.
Click Stop Record.
In the Save As dialog box, type a name for the file, and then click Save (the file is saved with the .zip file name extension).
To view the record of the steps you recorded, open the .zip file you just saved, and then double-click the file. The document will open in your browser.
Sunday, November 4, 2012
Add background Image to your USB / Removable Drive
1.) Copy Paste the following code in the notepad and rename that notepad file to Desktop.ini
(Just make sure when you paste this code, the Double Quotes are in Notepad format otherwise type the Double quotes manually from your keyboard.)
[{BE098140-A513-11D0-A3A4-00C04FD706EC}]
iconarea_image="back.jpg"
iconarea_text="0xFFFFFF"
2.) Choose any image of your choice and rename it to back.jpg
3.) Copy Paste both these files (i.e. desktop.ini and back.jpg) into your USB device and make them hidden by selecting Properties -> Hidden Files.
That’s it. You are done. Here is a Sample Image I have inserted in my Pen-Drive.

Just REFRESH your screen and you will see your image on background.
If you need help Selecting your text color (Iconarea_text) you can prefer the chart given below...

The color-code shown over the color are respective code for that color..
Sunday, August 19, 2012
A Simple Method to find out if your PC is infected by VIRUS or not:
- Go to the Start Menu, open the 'Run' Tab and type the system.ini , confirm by clicking OK.
- A Window will open:

It means that your PC is clean !!
- But if you have this message with red stars, is means that the PC is infected.
- It is therefore necessary to scan and disinfect your Computer or PC.


Limited hours for kids[Parental control]
Here is how to restrict use to times that you yourself decided :
- To begin, each person you want to restrict the use of the PC must have its own account
- Click "Start " then "All Programs" "Accessories" and finally click on "Command Prompt".
- In the window that opens, then enter the following command:
- Net user[name]/time[days and hours]
- Replace[name] by the name of the user for which you want to restrict the use of the computer and then[day and time] by the restriction values.
- For example, to prohibit the user to log on 'Alok' weekdays between 9 AM and 20 PM and weekends between 18 PM and 20 PM, type the following command:
- Alok net user / time: Monday-Friday , 09:00-20:00, Saturday-Sunday , 18:00-20:00
- You can also apply these rules for each day of the week and to go faster to just write the initials on day like this (for my Tuesday and Wednesday for me).
- Alok net user / time: L, 6:00 p.m. to 8:00 p.m.; Ma, 6:00 p.m. to 9:00 p.m.; Me, 10:00 a.m. to 8:00 p.m.
- Then confirm with OK
- The day you want to remove all restrictions so that a user can log in anytime, enter the command:
- Alok net user / time: all
Saturday, May 5, 2012
How to Activate Avast Internet Security 7 with a License File?
1>> Download the setup file from here.
2>> The setup file is around 94 MB and would take few minutes to download.
3>> Once downloaded, double click on the setup file avast_internet_security_setup.exe .
4>> Once the installation begins, you will be given 3 options on the mode of installing : a) Express Install b) Compatible Install c) Custom Install.
Here, choose “Express Install” if you don’t have any other antivirus software already installed on your computer.
Choose “Compatible Install” if you already have an antivirus application running on your computer and you want to use avast! Internet Security 7 as a secondary line of defense.
I don’t recommend “Custom install” option for new users however naive users can go ahead with it.

5>> After choosing on of the modes, you will soon be asked to enter the avast Internet Security 7 License File or activation code if you have one.
Else you can continue with the “Install in trial mode“.
You can also enter an activation key by choosing the option “Supply an activation code” . In this case you will need to enter name, email and some more details.
 6>>A typical avast Internet Security 7 License File would look like this :

It would have a typical .avastlic extension.
To use this license file, choose “Supply a license file” mode and click on browse.
If you want a avast Internet Security 7 license file or activation code for yourself, you can Google it
or you can download the one I am providing here..
1. Avast Internet Security License file Valid till Apr 2013.
2. Avast Antivirus Pro License file Valid till Sep 2012.
3. Avast Internet Security License file Valid till Aug 2013. NEW (updated)
Now browse for the file to the location where it is stored.
Click on “Next>” .

7>>The installation will now begin and would take a few minutes to complete. So please be patient and have a sip of coffee.

8>> Soon after installation is complete, avast Internet Security 7 starts to scan your computer for any viruses or malwares that would eventually exist.
You can cancel the process if you don’t like, but I highly recommend it.
 9>> While scanning, avast Internet Security 7 takes action on viruses and worms. After that, you will be asked to restart your computer. So click on “Finish” .
 10>> After the restart, open avast Internet Security 7 and update the virus signature database.
 Your computer is now protected.
2>> The setup file is around 94 MB and would take few minutes to download.
3>> Once downloaded, double click on the setup file avast_internet_security_setup.exe .
4>> Once the installation begins, you will be given 3 options on the mode of installing : a) Express Install b) Compatible Install c) Custom Install.
Here, choose “Express Install” if you don’t have any other antivirus software already installed on your computer.
Choose “Compatible Install” if you already have an antivirus application running on your computer and you want to use avast! Internet Security 7 as a secondary line of defense.
I don’t recommend “Custom install” option for new users however naive users can go ahead with it.

Else you can continue with the “Install in trial mode“.
You can also enter an activation key by choosing the option “Supply an activation code” . In this case you will need to enter name, email and some more details.

It would have a typical .avastlic extension.
To use this license file, choose “Supply a license file” mode and click on browse.
If you want a avast Internet Security 7 license file or activation code for yourself, you can Google it
or you can download the one I am providing here..
1. Avast Internet Security License file Valid till Apr 2013.
2. Avast Antivirus Pro License file Valid till Sep 2012.
3. Avast Internet Security License file Valid till Aug 2013. NEW (updated)
Now browse for the file to the location where it is stored.
Click on “Next>” .

7>>The installation will now begin and would take a few minutes to complete. So please be patient and have a sip of coffee.
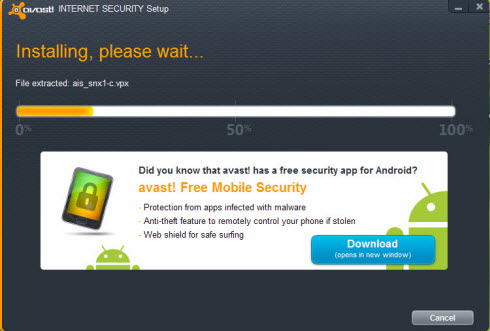
8>> Soon after installation is complete, avast Internet Security 7 starts to scan your computer for any viruses or malwares that would eventually exist.
You can cancel the process if you don’t like, but I highly recommend it.


Thursday, April 26, 2012
Add Image to Folder Background in WinXP
Hi, Today we will see how to add an image to the background of any folder.
Here I am giving u a example, It looks like this:

1.) Create a New Folder, or just open a folder in which you wish to add the background image.
2.) Copy the image you wish to display in that folder and after that Copy this code in notepad
[ExtShellFolderViews]
{BE098140-A513-11D0-A3A4-00C04FD706EC}={BE098140-A513-11D0-A3A4-00C04FD706EC}
[{BE098140-A513-11D0-A3A4-00C04FD706EC}]
IconArea_Image= "image name.jpg"
3.) After this
4.) After this, right click on that folder, click properties and select Customize tab, then click on change icon, here choose any icon. After that the background image will appear...
5.) Enjoy you have done it!
Here I am giving u a example, It looks like this:

1.) Create a New Folder, or just open a folder in which you wish to add the background image.
2.) Copy the image you wish to display in that folder and after that Copy this code in notepad
[ExtShellFolderViews]
{BE098140-A513-11D0-A3A4-00C04FD706EC}={BE098140-A513-11D0-A3A4-00C04FD706EC}
[{BE098140-A513-11D0-A3A4-00C04FD706EC}]
IconArea_Image= "image name.jpg"
3.) After this
Save the notepad file in folder for which you wish to add background image, as "Desktop.ini"4.) After this, right click on that folder, click properties and select Customize tab, then click on change icon, here choose any icon. After that the background image will appear...
5.) Enjoy you have done it!
Wednesday, April 25, 2012
Change the ICON of drives in my computer
All the Xp users would have been bored by the boring icons in their My Computer panel which are adjacent to the Hard disk drives(C:,D: or whatever drive letter you have).
Here is a simple tweak by which you will be able to change this monotonous icon to anything you like, even your own Picture if you wish.
You can put any image in place of one which I have shown, even the picture of your favourite celebrity or your own Picture.
Here are the steps you need to follow:
1. First of all the picture you want to use should have .ico extension(if you already have a pic with .ico extension proceed to step 2
2. Most of the pictures we normally use have extensions like .jpg, .bmp, .png, .gif etc, so you first need to convert them to one with .ico extension. This is simple. Use any Image Converter Softwares to convert your image to .ico format.
3. Now go to My Computer. Suppose you want to put this icon in place of your original C: Drive.
Double click and enter C: Paste your .ico image file in it. Also create a new text file and in it type the following lines:
[autorun]
ICON=favicon.ico
Remember that 'favicon.ico' in the second line is the name of your image file. If you have an image file with .ico extension by the name of 'abc.ico', then use that in the second line in place of 'favicon.ico'.
4. Now rename this text file as "autorun.inf" (without the quotes).
5. Now restart your Pc. You are done. Check out the cool new picture you have just added in your My computer panel.
Like the one given below... Below is my My Computer Image!
Here is a simple tweak by which you will be able to change this monotonous icon to anything you like, even your own Picture if you wish.
You can put any image in place of one which I have shown, even the picture of your favourite celebrity or your own Picture.
Here are the steps you need to follow:
1. First of all the picture you want to use should have .ico extension(if you already have a pic with .ico extension proceed to step 2
2. Most of the pictures we normally use have extensions like .jpg, .bmp, .png, .gif etc, so you first need to convert them to one with .ico extension. This is simple. Use any Image Converter Softwares to convert your image to .ico format.
3. Now go to My Computer. Suppose you want to put this icon in place of your original C: Drive.
Double click and enter C: Paste your .ico image file in it. Also create a new text file and in it type the following lines:
[autorun]
ICON=favicon.ico
Remember that 'favicon.ico' in the second line is the name of your image file. If you have an image file with .ico extension by the name of 'abc.ico', then use that in the second line in place of 'favicon.ico'.
4. Now rename this text file as "autorun.inf" (without the quotes).
5. Now restart your Pc. You are done. Check out the cool new picture you have just added in your My computer panel.
Like the one given below... Below is my My Computer Image!
 |
| AR-PC Image |
Recover the lost administrators password in Windows XP
Slightly more work needed if you lose or forget the Windows XP administrator password.
1. First reboot Windows XP in safe mode by re-starting the computer and pressing F8 repeated as the computer starts up.
2. Then (in safe mode) click Start and then click Run. In the open box type
"control userpasswords2"
without the quotes - I have just used quotes to differentiate what you have to type.
3. You will now have access to all the user accounts, including the administrators account and will be able to reset the lost password.
4. Just click the administrators user account, and then click Reset Password.
5. You will need to add a new password in the New password and the Confirm new password boxes, and confirm by clicking OK.
All done, you have recovered the lost administrators password!
1. First reboot Windows XP in safe mode by re-starting the computer and pressing F8 repeated as the computer starts up.
2. Then (in safe mode) click Start and then click Run. In the open box type
"control userpasswords2"
without the quotes - I have just used quotes to differentiate what you have to type.
3. You will now have access to all the user accounts, including the administrators account and will be able to reset the lost password.
4. Just click the administrators user account, and then click Reset Password.
5. You will need to add a new password in the New password and the Confirm new password boxes, and confirm by clicking OK.
All done, you have recovered the lost administrators password!
Create Your Own Logon Message
1) Click start
click run
type regedit,
then click ok!
2) In The registry editor, drill down to the following key:
hklm\software\Microsoft\Windows NT\Current version\Winlogon.
3 Right click LegalNoticeCaption,
click modify,
Type: TricK by Alok, and then click ok!
4 Right click legalNoticeText,
click modify,
Type: Welcome to my PC-Wolrd, and then click ok!
and then Close your message!
5 Restart Your Computer.
6 The message will appear every time you logon!
click run
type regedit,
then click ok!
2) In The registry editor, drill down to the following key:
hklm\software\Microsoft\Windows NT\Current version\Winlogon.
3 Right click LegalNoticeCaption,
click modify,
Type: TricK by Alok, and then click ok!
4 Right click legalNoticeText,
click modify,
Type: Welcome to my PC-Wolrd, and then click ok!
and then Close your message!
5 Restart Your Computer.
6 The message will appear every time you logon!
Folder Lock Without Password Without Any Software Method 2
In this post i'm going to tell you how to lock your folders without any software.
I already describe a method and this method is also helps you to protect your contents.
TRY to lock ur private folder
Suppose you want to lock the folder "Alok" in D: which has the path "D:\Alok". In the same drive create a text file and type-
ren Alok Alok.{21EC2020-3AEA-1069-A2DD-08002B30309D}
TRY to lock ur private folder
Suppose you want to lock the folder "Alok" in D: which has the path "D:\Alok". In the same drive create a text file and type-
ren Alok Alok.{21EC2020-3AEA-1069-A2DD-08002B30309D}
Now save this text file as:- Lock.bat
Create another text file and type in it
Create another text file and type in it
ren Alok.{21EC2020-3AEA-1069-A2DD-08002B30309D} Alok
Now save this text file as:- Unlock.bat
Now you can see 2 batch files Lock and Unlock. Dbl Click on Lock and the folder Alok will change to control panel and you cannot view its contents. Dbl Click Unlock and you will get back your original folder. Try it out!!!
Now you can see 2 batch files Lock and Unlock. Dbl Click on Lock and the folder Alok will change to control panel and you cannot view its contents. Dbl Click Unlock and you will get back your original folder. Try it out!!!
Friday, April 20, 2012
Speed Up Your Windows XP
Hey folks...
In this post I'm going to tell you how to speed up your windows XP using registry...
Let’s get straight to the point. This Windows XP registry tweak will make your system boot much faster. How much?
I can not say exactly how much faster, since it all depends on your computer specifications (processor, RAM, hard-drive and stuff like that…), but from my experience, this tweak decreased the time to boot-up for about 9-10 seconds.
Now you see how great this registry tweak is and it will get even better when you see how simple it is to apply. I will do my best to show you step-by-step and make it plain simple and of course with screenshots included.
How to make Windows XP start faster:
1. Click on “Start” on the taskbar.
2. Click “Run” located in the start menu.
3. Then in the “Run” panel, type: “regedit” without the quotation marks. (that will open up the Windows registry editor)
4. Then click on “HKEY_LOCAL_MACHINE” and expand it.
5. Then click on “SYSTEM” and expand it.
6. Then scroll down, and expand “CurrentControlSet”.
7. Under that, expand “Control”.
8. Then, under that one, locate and click on “ContentIndex”. (so when you click on it, it needs to be highlighted and it’s options need to show up in the right panel of Windows XP Registry Editor)
So to sum up, here’s where you need to navigate to:
HKEY_LOCAL_MACHINE \ SYSTEM \ CurrentControlSet \ Control \ ContentIndex
Let’s continue… You have just 6 more steps until the finish line!
9. When you have clicked on “ContentIndex” and it is highlighted and you see the options and parameters on the right side of the panel… Among those, you need to scroll all the way to the bottom and find the Registry key named “StartupDelay”.
10. Double-click on it and a new window panel will pop-up.
11. The new window has a field to enter value (and a default value entered already). But before you change the value, you need to change the base from Hexadecimal to Decimal.
Now when you change it to Decimal, it displays a different value (480000 instead of 75300).
12. So now, all you need to do is change the value from “480000” to “40000” (forty thousand)
Many people ask me if they can change it to an even smaller value than 40000, but I would not recommend doing that. I tested it and it doesn’t work. I did not feel any difference in boot-up time when I change it to value less than 40000 (and no, you can’t put 0 either).
13. After you’ve completed all the steps above, click “OK” and close the Registry Editor.
And one just one little thing you need to do to finish all this registry tweaking…
14. Restart your computer.
Now you can notice big difference in time that your system takes to boot-up. Mine was faster for 10 seconds than usual.
In this post I'm going to tell you how to speed up your windows XP using registry...
Let’s get straight to the point. This Windows XP registry tweak will make your system boot much faster. How much?
I can not say exactly how much faster, since it all depends on your computer specifications (processor, RAM, hard-drive and stuff like that…), but from my experience, this tweak decreased the time to boot-up for about 9-10 seconds.
Now you see how great this registry tweak is and it will get even better when you see how simple it is to apply. I will do my best to show you step-by-step and make it plain simple and of course with screenshots included.
How to make Windows XP start faster:
1. Click on “Start” on the taskbar.
2. Click “Run” located in the start menu.
3. Then in the “Run” panel, type: “regedit” without the quotation marks. (that will open up the Windows registry editor)
4. Then click on “HKEY_LOCAL_MACHINE” and expand it.
5. Then click on “SYSTEM” and expand it.
6. Then scroll down, and expand “CurrentControlSet”.
7. Under that, expand “Control”.
8. Then, under that one, locate and click on “ContentIndex”. (so when you click on it, it needs to be highlighted and it’s options need to show up in the right panel of Windows XP Registry Editor)
So to sum up, here’s where you need to navigate to:
HKEY_LOCAL_MACHINE \ SYSTEM \ CurrentControlSet \ Control \ ContentIndex
Let’s continue… You have just 6 more steps until the finish line!
9. When you have clicked on “ContentIndex” and it is highlighted and you see the options and parameters on the right side of the panel… Among those, you need to scroll all the way to the bottom and find the Registry key named “StartupDelay”.
10. Double-click on it and a new window panel will pop-up.
11. The new window has a field to enter value (and a default value entered already). But before you change the value, you need to change the base from Hexadecimal to Decimal.
Now when you change it to Decimal, it displays a different value (480000 instead of 75300).
12. So now, all you need to do is change the value from “480000” to “40000” (forty thousand)
Many people ask me if they can change it to an even smaller value than 40000, but I would not recommend doing that. I tested it and it doesn’t work. I did not feel any difference in boot-up time when I change it to value less than 40000 (and no, you can’t put 0 either).
13. After you’ve completed all the steps above, click “OK” and close the Registry Editor.
And one just one little thing you need to do to finish all this registry tweaking…
14. Restart your computer.
Now you can notice big difference in time that your system takes to boot-up. Mine was faster for 10 seconds than usual.
Subscribe to:
Posts (Atom)