- Open Registry editor [by typing regedit in RUN dialog box and press Enter].
- Now expand "HKEY_CLASSES_ROOT" key.
- Search for the file type you want to remove from "New" menu, e.g. for removing "Rich Text Document (.rtf)" file type look for .rtf key under HKEY_CLASSES_ROOT key.
- Now Expand it and delete the ShellNew key present under it.
- That's it. The file type will no longer be available under the "New" menu.
Showing posts with label PC-Care. Show all posts
Showing posts with label PC-Care. Show all posts
Friday, April 15, 2016
To Remove an Item from "New" Context Menu

How to Add Items to “New” Context Menu in Windows
- Type regedit in RUN dialog box and press Enter. It'll open Registry Editor.
- Now expand "HKEY_CLASSES_ROOT" key.
- Now look for a sub-key having same name as the file type which you want to add in "New" menu. e.g. if you want to add JS file type to "New" menu, look for .js key under HKEY_CLASSES_ROOT key.
- Now right-click on it and select "New -> Key" option. It'll create a new key, give it name ShellNew
- Now in right-side pane, right-click and select "New -> String Value". Give it a name NullFile and press Enter.
- Hurray!! You done it. Now you will have a new JavaScript file option in context menu.
Wednesday, January 13, 2016
AVG Internet Security 2016/2015/2014 Multilingual Working Serials..
Below, i m giving you 20+ license numbers working for multilingual AVG Internet Security 2016/2015/2014 on both Windows 32-bit and 64-bit platforms.
License Info
- Product Name: AVG Internet Security 2016 (Full, 145000 computers)
- License Expires: Wednesday, February 28, 2018
- 8MEH-RGM33-K474L-6FGRR-8HHTL-UEMBR-ACED
- 8MEH-R2CML-SS7FW-MOXFR-TRU8V-3EMBR-ACED
- 8MEH-R336M-QDYTV-ECNOR-6VWKU-CEMBR-ACED
- 8MEH-R3VBQ-DC433-3FPOA-YADFU-NEMBR-ACED
- 8MEH-R3VBQ-DC433-3FPOA-YFE9U-NEMBR-ACED
- 8MEH-R6633-YP39H-YCNSR-H7BQT-EEMBR-ACED
- 8MEH-R6633-YP39H-YCNSR-HHW2U-EEMBR-ACED
- 8MEH-RWEYH-SXKCN-6H9FR-39X22-6EMBR-ACED
- 8MEH-RD8B8-2GXG3-Z6YQA-EKSSM-GEMBR-ACED
- 8MEH-RFOD4-SXWR8-JRTQA-JKHAM-WEMBR-ACED
- 8MEH-RNZLL-2Y4QX-79PPA-MPLRF-AEMBR-ACED
- 8MEH-RR6GC-KLJJD-S7DBA-NWGU9-EEMBR-ACED
- 8MEH-RMXLW-HN44A-BABPA-S3LRF-PEMBR-ACED
- 8MEH-RWEYH-SGLCN-6H9FR-34S98-6EMBR-ACED
- 8MEH-R2CML-SS7FW-MOXFR-THMOW-3EMBR-ACED
- 8MEH-RRX6F-OD26X-H9ZCR-XBTF3-PEMBR-ACED
- 8MEH-RWEYH-SGLCN-6H9FR-3FDL4-6EMBR-ACED
- 8MEH-RU7JQ-ACDRM-MQEPR-GGFT3-FEMBR-ACED
- 8MEH-RK82S-PWO92-C33BA-Q7RAA-GEMBR-ACED
- 8MEH-RWVTJ-WWADY-S899R-N2ON9-NEMBR-ACED
- 8MEH-RTW3W-YQLQ3-KUK8A-RNRN7-OEMBR-ACED
- 8MEH-RF3MY-BZ7CJ-9LUAR-SPR9J-CEMBR-ACED
- 8MEH-RCKOP-BP9KK-YW8EA-67H7O-SEMBR-ACED
- 8MEH-R6633-YP39H-YCNSR-HHW2U-EEMBR-ACED
- 8MEH-RQEZT-BQJG3-E64FA-9YDWD-6EMBR-ACED
- 8MEH-RF22Z-ANGGS-QDWMR-27TAN-BEMBR-ACED
- 8MEH-RS47Y-82HT8-GONVA-BCCCZ-DEMBR-ACED
- 8MEH-RXYFD-JUV72-8922R-FTDO8-QEMBR-ACED
- 8MEH-RGM33-K474L-6FGRR-8QEFN-UEMBR-ACED
- 8MEH-R6BFE-HWUHF-DPNDA-VFUWX-2EMBR-ACED
- 8MEH-RXYFD-JUV72-8922R-FTDO8-QEMBR-ACED
- 8MEH-RFR8J-PTS8Q-92ATA-ORC6Q-JEMBR-ACED
This work/post/keys are licensed under a Creative Commons Attribution-NonCommercial-ShareAlike 4.0 International License
AVG Internet Security 2015 Working Serial Keys are Here
Updated KEYS
8MEH-R78BH-EYG8L-MLMVA-Z2RWY-GEMBR-ACED
8MEH-R9Q3V-ZHN2T-92KCR-AYPHR-YEMBR-ACED
8MEH-RYH2W-SAT6N-H2HGA-WPAXZ-9EMBR-ACED
8MEH-RFOD4-SXWR8-JRTQA-J66DN-WEMBR-ACED
8MEH-RYGA4-P8CR8-WQV7A-7ZMJ4-8EMBR-ACED
8MEH-RYH2W-SAT6N-H2HGA-W2AS2-9EMBR-ACED
8MEH-RFOD4-SXWR8-JRTQA-J66DN-WEMBR-ACED
8MEH-RYGA4-P8CR8-WQV7A-7ZMJ4-8EMBR-ACED
8MEH-REJA9-D2M3S-337LR-DAXEM-REMBR-ACED
8MEH-RBG6H-9C2PW-G499A-LPHAP-8EMBR-ACED
8MEH-RRX6F-OD26X-H9ZCR-XQDX9-PEMBR-ACED
8MEH-RCKOP-BP9KK-YW8EA-6OKSL-SEMBR-ACED
8MEH-R78BH-EYG8L-MLMVA-Z2RWY-GEMBR-ACED
8MEH-R9Q3V-ZHN2T-92KCR-AYPHR-YEMBR-ACED
8MEH-RYH2W-SAT6N-H2HGA-WPAXZ-9EMBR-ACED
8MEH-RG9B7-BG7WC-PXRCR-JF3UP-HEMBR-ACED
8MEH-RG9B7-BG7WC-PXRCR-JF3UP-HEMBR-ACED
Serial KEYS
8MEH-R78BH-EYG8L-MLMVA-Z2RWY-GEMBR-ACED
8MEH-R9Q3V-ZHN2T-92KCR-AYPHR-YEMBR-ACED
8MEH-RYH2W-SAT6N-H2HGA-WPAXZ-9EMBR-ACED
8MEH-RFOD4-SXWR8-JRTQA-J66DN-WEMBR-ACED
8MEH-RYGA4-P8CR8-WQV7A-7ZMJ4-8EMBR-ACED
8MEH-RYH2W-SAT6N-H2HGA-W2AS2-9EMBR-ACED
8MEH-RFOD4-SXWR8-JRTQA-J66DN-WEMBR-ACED
8MEH-RYGA4-P8CR8-WQV7A-7ZMJ4-8EMBR-ACED
8MEH-REJA9-D2M3S-337LR-DAXEM-REMBR-ACED
8MEH-RBG6H-9C2PW-G499A-LPHAP-8EMBR-ACED
8MEH-RRX6F-OD26X-H9ZCR-XQDX9-PEMBR-ACED
8MEH-RCKOP-BP9KK-YW8EA-6OKSL-SEMBR-ACED
8MEH-R78BH-EYG8L-MLMVA-Z2RWY-GEMBR-ACED
8MEH-R9Q3V-ZHN2T-92KCR-AYPHR-YEMBR-ACED
8MEH-RYH2W-SAT6N-H2HGA-WPAXZ-9EMBR-ACED
8MEH-RG9B7-BG7WC-PXRCR-JF3UP-HEMBR-ACED
8MEH-RG9B7-BG7WC-PXRCR-JF3UP-HEMBR-ACED
Serial KEYS
8MEH-RJR4R-7FDJ6-NL3DA-CRXQC-JEMBR-ACED
8MEH-RXYFD-JDY72-8922R-FGLP8-QEMBR-ACED
8MEH-RYH2W-SRS6N-H2HGA-WCDTZ-9EMBR-ACED
8MEH-RQEZT-B9MG3-E64FA-99LLH-6EMBR-ACED
8MEH-RTN2Z-UUKMK-6RWGA-AAM82-VEMBR-ACED
8MEH-RB32G-U868U-TRLQR-B68SM-CEMBR-ACED
8MEH-RRX6F-OU36X-H9ZCR-XARDZ-PEMBR-ACED
8MEH-RAJC2-OLO77-KRRQA-HLSNJ-REMBR-ACED
8MEH-RWEYH-SXKCN-6H9FR-39X22-6EMBR-ACED
8MEH-RJR4R-7FDJ6-NL3DA-CGK2C-JEMBR-ACED
8MEH-RQX93-WH4KW-BE2FR-QDQ4B-PEMBR-ACED
8MEH-RNXBD-G4VHF-BSLSR-Z9C6C-PEMBR-ACED
8MEH-R2CML-SS7FW-MOXFR-TVC9T-3EMBR-ACED
8MEH-RFR8J-PTS8Q-92ATA-O4WHO-JEMBR-ACED
8MEH-RPDWL-THRLY-O8Z3R-4H3OA-4EMBR-ACED
8MEH-RCB97-4HRT9-P4RRR-RRFOP-2EMBR-ACED
Wednesday, December 23, 2015
Enable Administrator account in Windows 7 or later versions
Yes! It's possible.
The biggest mystery finally revealed. We can enable the administrator account in any version of windows. You might be wondering sometime that even your account is already an admin account, why your pc asks/prompts you to run a program as admin. This is because every pc has a hidden administrator account, and only that particular account has the full permission to do any thing.
So here you go-
To enable the administrator account :
1. Open command prompt as Administrator.
a. To do so you can right click on the cmd icon in start menu and select Run as Admin.
2. Type the following command on the command prompt:
net user administrator /active:yes
and press enter key. A message will appear saying Command competed successfully.
and you are done, go back to logon screen and you will have a Administrator account.
3. To switch it off back again go to command prompt. and type the following command.
net user administrator /active:no
The biggest mystery finally revealed. We can enable the administrator account in any version of windows. You might be wondering sometime that even your account is already an admin account, why your pc asks/prompts you to run a program as admin. This is because every pc has a hidden administrator account, and only that particular account has the full permission to do any thing.
So here you go-
To enable the administrator account :
1. Open command prompt as Administrator.
a. To do so you can right click on the cmd icon in start menu and select Run as Admin.
2. Type the following command on the command prompt:
net user administrator /active:yes
and press enter key. A message will appear saying Command competed successfully.
and you are done, go back to logon screen and you will have a Administrator account.
3. To switch it off back again go to command prompt. and type the following command.
net user administrator /active:no
Wednesday, October 15, 2014
Cool Windows 8 [v.8.1] facts you should know
1. You Can Shut Down in Two Clicks
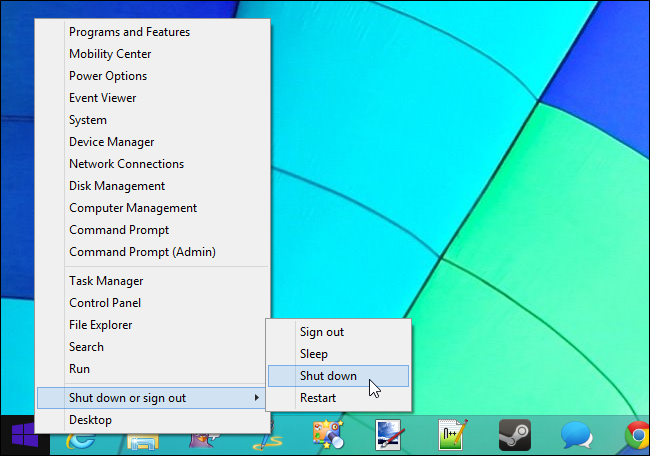
Press Windows Key + X or right-click the Start button to open the power user menu. This menu contains shortcuts with quick access to commonly used options like the Control Panel, Task Manager, and File Explorer.
2. Show Administrative Tools

The system tools found in the Windows Administrative Tools folder — applications like the Task Scheduler, Event Viewer, Services, and Computer Management tools — are normally hidden. They won’t appear in your All apps list and you won’t be able to find them by searching your installed applications, either. If you need them, head to the Start screen, press Windows Key + C, select Settings, select Tiles, and enable the Show administrative tools option on the Tiles pane.
3. Windows To Go

Of the entire list here, this is one feature that offers the most convenience to users. Windows To Go allows users to make a copy of their OS complete with their settings, wallpapers, files and even apps, into a USB/Pen drive. Plugged it into another computer with Windows 8 already installed, and you can boot up the PC and make it look exactly alike the OS you normally use, with all settings intact.
4. Windows Live Syncing

Similar to Windows To Go, the new Windows 8 will provide Windows Live syncing, such that users can login on any Windows 8 PC with ‘Live ID’ and get back their own personalized settings on it. The desktop will look the same every time the user login on a PC with their Windows Live account. Migrating to a new PC is probably made easier when the user has all the essential settings synced.
5. Built-In Antivirus

Windows 8 finally includes an integrated antivirus. The antivirus is named Windows Defender, although anyone who has used the free Microsoft Security Essentials will recognize the interface immediately. In Windows 8 Microsoft Security Essentials just has been renamed to Windows Defender.
Press Windows Key + X or right-click the Start button to open the power user menu. This menu contains shortcuts with quick access to commonly used options like the Control Panel, Task Manager, and File Explorer.
2. Show Administrative Tools
The system tools found in the Windows Administrative Tools folder — applications like the Task Scheduler, Event Viewer, Services, and Computer Management tools — are normally hidden. They won’t appear in your All apps list and you won’t be able to find them by searching your installed applications, either. If you need them, head to the Start screen, press Windows Key + C, select Settings, select Tiles, and enable the Show administrative tools option on the Tiles pane.
3. Windows To Go
Of the entire list here, this is one feature that offers the most convenience to users. Windows To Go allows users to make a copy of their OS complete with their settings, wallpapers, files and even apps, into a USB/Pen drive. Plugged it into another computer with Windows 8 already installed, and you can boot up the PC and make it look exactly alike the OS you normally use, with all settings intact.
4. Windows Live Syncing
Similar to Windows To Go, the new Windows 8 will provide Windows Live syncing, such that users can login on any Windows 8 PC with ‘Live ID’ and get back their own personalized settings on it. The desktop will look the same every time the user login on a PC with their Windows Live account. Migrating to a new PC is probably made easier when the user has all the essential settings synced.
5. Built-In Antivirus
Cool Win 7 facts you should know..
1. Useful Keyboard Shortcuts
Using the mouse, you can drag-n-dock windows to either side of the screen, or drag it to the top to maximize it. These keyboard shortcuts are even faster:
Win+Left Arrow and Win+Right Arrow -> Dock the window to the left and right side of the screen
Win+Up Arrow and Win+Down Arrow -> Maximize and restore/minimize
Win+M -> minimizes everything
Alt+Up, Alt+Left Arrow, Alt+Right Arrow ->
Navigate to parent folder, or browse Back and Forward through folders in Explorer
Win+Home -> Minimizes/restores all open windows except the active window
Alt+Win+# -> Accesses the Jump List of program number ‘#’ on the taskbar.
2. Rearrange System Tray Icons
You can rearrange icons on the taskbar as you wish and start new (or switch to running) instances of the first ten taskbar programs using Win+1, Win+2, and so on. The cool thing is you can also rearrange system tray icons. Reorder them on the tray or move them outside or back in the tray. Take control of what you want to always keep an eye on, and from which apps you’ll require notifications.
3. Add Any Folder to Favorites

You can add any library or folder to the Favorites section in Windows Explorer. To add a folder, navigate to it in Explorer, right-click Favorites in the left navigation pane, and select Add current location to Favorites. Now you get quick access to your favorite folders in all File->Save As dialogs!
4. Create Keyboard Shortcuts for Programs

You can create keyboard shortcuts for any program in Windows 7. Right-click the program icon and select Properties. Select the Shortcut tab, click in Shortcut key, to set the keyboard shortcut for that program.
5. Open Command Prompt in Any Folder

Miss the "Open Command Window Here" Windows XP power toy? Press "Shift" when right-clicking on a folder to get that option in the context menu. This also works on the desktop. No power toy required!
6. View Expanded ‘Send To’ Menu
Press Shift when right-clicking on a folder to get an expanded Send To menu.
7. Customize the Power Button

Change the default Shutdown power button to Hibernate. Right-click on Start, select Properties, and choose the Power button action that you use the most (Stand by, Hibernate Shut down, Restart whatever you want).
8. Search Internet from the Start Menu

Enable Internet search from the Start Menu using your default browser. Run GPEDIT.MSC from the Start Menu search box to start the Group Policy Editor. In the left pane, go to User Configuration->Administrative Templates->Start Menu and Taskbar. In the right pane, right-click to Edit and Enable Add Search Internet link to Start Menu.

9. Add Videos to Start Menu

Windows 7 does not have a link to your videos on the Start Menu by default. To add a link to your videos on the Start Menu, right-click Start, select Properties, click on Customize. In the Videos section at the bottom, choose Display as a link.
10. Send information to tech support

The next time you find yourself trying to describe a complicated computer problem to a friend or tech support, give Problem Steps Recorder a try. You can record a series of screen shots, add notes, and email them directly to whoever is helping you. Do you Know how to open it???
Here is how to Open Problem Steps Recorder.
Click on the Start button, and then type psr. In the list of results, click psr.
Click Start Record. On your computer, go through the steps on your computer to reproduce the problem. You can pause the recording at any time, and then resume it later.
Click Stop Record.
In the Save As dialog box, type a name for the file, and then click Save (the file is saved with the .zip file name extension).
To view the record of the steps you recorded, open the .zip file you just saved, and then double-click the file. The document will open in your browser.
Using the mouse, you can drag-n-dock windows to either side of the screen, or drag it to the top to maximize it. These keyboard shortcuts are even faster:
Win+Left Arrow and Win+Right Arrow -> Dock the window to the left and right side of the screen
Win+Up Arrow and Win+Down Arrow -> Maximize and restore/minimize
Win+M -> minimizes everything
Alt+Up, Alt+Left Arrow, Alt+Right Arrow ->
Navigate to parent folder, or browse Back and Forward through folders in Explorer
Win+Home -> Minimizes/restores all open windows except the active window
Alt+Win+# -> Accesses the Jump List of program number ‘#’ on the taskbar.
2. Rearrange System Tray Icons
 |
3. Add Any Folder to Favorites
You can add any library or folder to the Favorites section in Windows Explorer. To add a folder, navigate to it in Explorer, right-click Favorites in the left navigation pane, and select Add current location to Favorites. Now you get quick access to your favorite folders in all File->Save As dialogs!
4. Create Keyboard Shortcuts for Programs
You can create keyboard shortcuts for any program in Windows 7. Right-click the program icon and select Properties. Select the Shortcut tab, click in Shortcut key, to set the keyboard shortcut for that program.
5. Open Command Prompt in Any Folder
Miss the "Open Command Window Here" Windows XP power toy? Press "Shift" when right-clicking on a folder to get that option in the context menu. This also works on the desktop. No power toy required!
6. View Expanded ‘Send To’ Menu
Press Shift when right-clicking on a folder to get an expanded Send To menu.
[Image preview provided above.]
7. Customize the Power Button
Change the default Shutdown power button to Hibernate. Right-click on Start, select Properties, and choose the Power button action that you use the most (Stand by, Hibernate Shut down, Restart whatever you want).
8. Search Internet from the Start Menu
Enable Internet search from the Start Menu using your default browser. Run GPEDIT.MSC from the Start Menu search box to start the Group Policy Editor. In the left pane, go to User Configuration->Administrative Templates->Start Menu and Taskbar. In the right pane, right-click to Edit and Enable Add Search Internet link to Start Menu.
9. Add Videos to Start Menu
Windows 7 does not have a link to your videos on the Start Menu by default. To add a link to your videos on the Start Menu, right-click Start, select Properties, click on Customize. In the Videos section at the bottom, choose Display as a link.
10. Send information to tech support
The next time you find yourself trying to describe a complicated computer problem to a friend or tech support, give Problem Steps Recorder a try. You can record a series of screen shots, add notes, and email them directly to whoever is helping you. Do you Know how to open it???
Here is how to Open Problem Steps Recorder.
Click on the Start button, and then type psr. In the list of results, click psr.
Click Start Record. On your computer, go through the steps on your computer to reproduce the problem. You can pause the recording at any time, and then resume it later.
Click Stop Record.
In the Save As dialog box, type a name for the file, and then click Save (the file is saved with the .zip file name extension).
To view the record of the steps you recorded, open the .zip file you just saved, and then double-click the file. The document will open in your browser.
Sunday, November 4, 2012
Add background Image to your USB / Removable Drive
1.) Copy Paste the following code in the notepad and rename that notepad file to Desktop.ini
(Just make sure when you paste this code, the Double Quotes are in Notepad format otherwise type the Double quotes manually from your keyboard.)
[{BE098140-A513-11D0-A3A4-00C04FD706EC}]
iconarea_image="back.jpg"
iconarea_text="0xFFFFFF"
2.) Choose any image of your choice and rename it to back.jpg
3.) Copy Paste both these files (i.e. desktop.ini and back.jpg) into your USB device and make them hidden by selecting Properties -> Hidden Files.
That’s it. You are done. Here is a Sample Image I have inserted in my Pen-Drive.

Just REFRESH your screen and you will see your image on background.
If you need help Selecting your text color (Iconarea_text) you can prefer the chart given below...

The color-code shown over the color are respective code for that color..
Sunday, August 19, 2012
A Simple Method to find out if your PC is infected by VIRUS or not:
- Go to the Start Menu, open the 'Run' Tab and type the system.ini , confirm by clicking OK.
- A Window will open:

It means that your PC is clean !!
- But if you have this message with red stars, is means that the PC is infected.
- It is therefore necessary to scan and disinfect your Computer or PC.


Limited hours for kids[Parental control]
Here is how to restrict use to times that you yourself decided :
- To begin, each person you want to restrict the use of the PC must have its own account
- Click "Start " then "All Programs" "Accessories" and finally click on "Command Prompt".
- In the window that opens, then enter the following command:
- Net user[name]/time[days and hours]
- Replace[name] by the name of the user for which you want to restrict the use of the computer and then[day and time] by the restriction values.
- For example, to prohibit the user to log on 'Alok' weekdays between 9 AM and 20 PM and weekends between 18 PM and 20 PM, type the following command:
- Alok net user / time: Monday-Friday , 09:00-20:00, Saturday-Sunday , 18:00-20:00
- You can also apply these rules for each day of the week and to go faster to just write the initials on day like this (for my Tuesday and Wednesday for me).
- Alok net user / time: L, 6:00 p.m. to 8:00 p.m.; Ma, 6:00 p.m. to 9:00 p.m.; Me, 10:00 a.m. to 8:00 p.m.
- Then confirm with OK
- The day you want to remove all restrictions so that a user can log in anytime, enter the command:
- Alok net user / time: all
Thursday, April 26, 2012
Add Image to Folder Background in WinXP
Hi, Today we will see how to add an image to the background of any folder.
Here I am giving u a example, It looks like this:

1.) Create a New Folder, or just open a folder in which you wish to add the background image.
2.) Copy the image you wish to display in that folder and after that Copy this code in notepad
[ExtShellFolderViews]
{BE098140-A513-11D0-A3A4-00C04FD706EC}={BE098140-A513-11D0-A3A4-00C04FD706EC}
[{BE098140-A513-11D0-A3A4-00C04FD706EC}]
IconArea_Image= "image name.jpg"
3.) After this
4.) After this, right click on that folder, click properties and select Customize tab, then click on change icon, here choose any icon. After that the background image will appear...
5.) Enjoy you have done it!
Here I am giving u a example, It looks like this:

1.) Create a New Folder, or just open a folder in which you wish to add the background image.
2.) Copy the image you wish to display in that folder and after that Copy this code in notepad
[ExtShellFolderViews]
{BE098140-A513-11D0-A3A4-00C04FD706EC}={BE098140-A513-11D0-A3A4-00C04FD706EC}
[{BE098140-A513-11D0-A3A4-00C04FD706EC}]
IconArea_Image= "image name.jpg"
3.) After this
Save the notepad file in folder for which you wish to add background image, as "Desktop.ini"4.) After this, right click on that folder, click properties and select Customize tab, then click on change icon, here choose any icon. After that the background image will appear...
5.) Enjoy you have done it!
Wednesday, April 25, 2012
Recover the lost administrators password in Windows XP
Slightly more work needed if you lose or forget the Windows XP administrator password.
1. First reboot Windows XP in safe mode by re-starting the computer and pressing F8 repeated as the computer starts up.
2. Then (in safe mode) click Start and then click Run. In the open box type
"control userpasswords2"
without the quotes - I have just used quotes to differentiate what you have to type.
3. You will now have access to all the user accounts, including the administrators account and will be able to reset the lost password.
4. Just click the administrators user account, and then click Reset Password.
5. You will need to add a new password in the New password and the Confirm new password boxes, and confirm by clicking OK.
All done, you have recovered the lost administrators password!
1. First reboot Windows XP in safe mode by re-starting the computer and pressing F8 repeated as the computer starts up.
2. Then (in safe mode) click Start and then click Run. In the open box type
"control userpasswords2"
without the quotes - I have just used quotes to differentiate what you have to type.
3. You will now have access to all the user accounts, including the administrators account and will be able to reset the lost password.
4. Just click the administrators user account, and then click Reset Password.
5. You will need to add a new password in the New password and the Confirm new password boxes, and confirm by clicking OK.
All done, you have recovered the lost administrators password!
Create Your Own Logon Message
1) Click start
click run
type regedit,
then click ok!
2) In The registry editor, drill down to the following key:
hklm\software\Microsoft\Windows NT\Current version\Winlogon.
3 Right click LegalNoticeCaption,
click modify,
Type: TricK by Alok, and then click ok!
4 Right click legalNoticeText,
click modify,
Type: Welcome to my PC-Wolrd, and then click ok!
and then Close your message!
5 Restart Your Computer.
6 The message will appear every time you logon!
click run
type regedit,
then click ok!
2) In The registry editor, drill down to the following key:
hklm\software\Microsoft\Windows NT\Current version\Winlogon.
3 Right click LegalNoticeCaption,
click modify,
Type: TricK by Alok, and then click ok!
4 Right click legalNoticeText,
click modify,
Type: Welcome to my PC-Wolrd, and then click ok!
and then Close your message!
5 Restart Your Computer.
6 The message will appear every time you logon!
Folder Lock Without Password Without Any Software Method 2
In this post i'm going to tell you how to lock your folders without any software.
I already describe a method and this method is also helps you to protect your contents.
TRY to lock ur private folder
Suppose you want to lock the folder "Alok" in D: which has the path "D:\Alok". In the same drive create a text file and type-
ren Alok Alok.{21EC2020-3AEA-1069-A2DD-08002B30309D}
TRY to lock ur private folder
Suppose you want to lock the folder "Alok" in D: which has the path "D:\Alok". In the same drive create a text file and type-
ren Alok Alok.{21EC2020-3AEA-1069-A2DD-08002B30309D}
Now save this text file as:- Lock.bat
Create another text file and type in it
Create another text file and type in it
ren Alok.{21EC2020-3AEA-1069-A2DD-08002B30309D} Alok
Now save this text file as:- Unlock.bat
Now you can see 2 batch files Lock and Unlock. Dbl Click on Lock and the folder Alok will change to control panel and you cannot view its contents. Dbl Click Unlock and you will get back your original folder. Try it out!!!
Now you can see 2 batch files Lock and Unlock. Dbl Click on Lock and the folder Alok will change to control panel and you cannot view its contents. Dbl Click Unlock and you will get back your original folder. Try it out!!!
Friday, April 20, 2012
Speed Up Your Windows XP
Hey folks...
In this post I'm going to tell you how to speed up your windows XP using registry...
Let’s get straight to the point. This Windows XP registry tweak will make your system boot much faster. How much?
I can not say exactly how much faster, since it all depends on your computer specifications (processor, RAM, hard-drive and stuff like that…), but from my experience, this tweak decreased the time to boot-up for about 9-10 seconds.
Now you see how great this registry tweak is and it will get even better when you see how simple it is to apply. I will do my best to show you step-by-step and make it plain simple and of course with screenshots included.
How to make Windows XP start faster:
1. Click on “Start” on the taskbar.
2. Click “Run” located in the start menu.
3. Then in the “Run” panel, type: “regedit” without the quotation marks. (that will open up the Windows registry editor)
4. Then click on “HKEY_LOCAL_MACHINE” and expand it.
5. Then click on “SYSTEM” and expand it.
6. Then scroll down, and expand “CurrentControlSet”.
7. Under that, expand “Control”.
8. Then, under that one, locate and click on “ContentIndex”. (so when you click on it, it needs to be highlighted and it’s options need to show up in the right panel of Windows XP Registry Editor)
So to sum up, here’s where you need to navigate to:
HKEY_LOCAL_MACHINE \ SYSTEM \ CurrentControlSet \ Control \ ContentIndex
Let’s continue… You have just 6 more steps until the finish line!
9. When you have clicked on “ContentIndex” and it is highlighted and you see the options and parameters on the right side of the panel… Among those, you need to scroll all the way to the bottom and find the Registry key named “StartupDelay”.
10. Double-click on it and a new window panel will pop-up.
11. The new window has a field to enter value (and a default value entered already). But before you change the value, you need to change the base from Hexadecimal to Decimal.
Now when you change it to Decimal, it displays a different value (480000 instead of 75300).
12. So now, all you need to do is change the value from “480000” to “40000” (forty thousand)
Many people ask me if they can change it to an even smaller value than 40000, but I would not recommend doing that. I tested it and it doesn’t work. I did not feel any difference in boot-up time when I change it to value less than 40000 (and no, you can’t put 0 either).
13. After you’ve completed all the steps above, click “OK” and close the Registry Editor.
And one just one little thing you need to do to finish all this registry tweaking…
14. Restart your computer.
Now you can notice big difference in time that your system takes to boot-up. Mine was faster for 10 seconds than usual.
In this post I'm going to tell you how to speed up your windows XP using registry...
Let’s get straight to the point. This Windows XP registry tweak will make your system boot much faster. How much?
I can not say exactly how much faster, since it all depends on your computer specifications (processor, RAM, hard-drive and stuff like that…), but from my experience, this tweak decreased the time to boot-up for about 9-10 seconds.
Now you see how great this registry tweak is and it will get even better when you see how simple it is to apply. I will do my best to show you step-by-step and make it plain simple and of course with screenshots included.
How to make Windows XP start faster:
1. Click on “Start” on the taskbar.
2. Click “Run” located in the start menu.
3. Then in the “Run” panel, type: “regedit” without the quotation marks. (that will open up the Windows registry editor)
4. Then click on “HKEY_LOCAL_MACHINE” and expand it.
5. Then click on “SYSTEM” and expand it.
6. Then scroll down, and expand “CurrentControlSet”.
7. Under that, expand “Control”.
8. Then, under that one, locate and click on “ContentIndex”. (so when you click on it, it needs to be highlighted and it’s options need to show up in the right panel of Windows XP Registry Editor)
So to sum up, here’s where you need to navigate to:
HKEY_LOCAL_MACHINE \ SYSTEM \ CurrentControlSet \ Control \ ContentIndex
Let’s continue… You have just 6 more steps until the finish line!
9. When you have clicked on “ContentIndex” and it is highlighted and you see the options and parameters on the right side of the panel… Among those, you need to scroll all the way to the bottom and find the Registry key named “StartupDelay”.
10. Double-click on it and a new window panel will pop-up.
11. The new window has a field to enter value (and a default value entered already). But before you change the value, you need to change the base from Hexadecimal to Decimal.
Now when you change it to Decimal, it displays a different value (480000 instead of 75300).
12. So now, all you need to do is change the value from “480000” to “40000” (forty thousand)
Many people ask me if they can change it to an even smaller value than 40000, but I would not recommend doing that. I tested it and it doesn’t work. I did not feel any difference in boot-up time when I change it to value less than 40000 (and no, you can’t put 0 either).
13. After you’ve completed all the steps above, click “OK” and close the Registry Editor.
And one just one little thing you need to do to finish all this registry tweaking…
14. Restart your computer.
Now you can notice big difference in time that your system takes to boot-up. Mine was faster for 10 seconds than usual.
Friday, March 23, 2012
15 Things Every PC User Should Know
Whether you're a grizzled tech veteran (Technical Expert) or an uninitiated newbie (newborn pc user), here are 15 essential facts and tricks that you ought to know.
Think you know tech? If you don't have a handle on every single one of these 15 tech facts, habits, and efficiency tricks, you're not living up to your potential.
1. Don't double-click everything. Windows 101: Double-clicking is how you open items in Windows. It's not how you open links in your Web browser, click buttons in dialog boxes, or do pretty much anything else--and if you reflexively double-click, you might accidentally zip right past something important or submit a form twice. If you don't need this reminder yourself, chances are you know someone who does.
2. Use slashes and backslashes in the appropriate situations. Let's get it straight: / is a slash (or forward slash, if you must), and \ is a backslash. Backslashes are conventionally used for Windows file paths (C:\Program Files\Whatever), while slashes are used for Internet addresses.
3. Record the exact error message. When your PC crashes, it'll usually try to tell you why it is doing so--albeit with a string of numbers and letters that you won't understand. Write the message down in its entirety (or take a screenshot, if possible) so you can later plug it into Google or give it to your tech support agent. If your PC didn't provide an error message, go to Action Center (in the Control Panel) and see if it shows up under 'View archived messages' or 'View problems to report'.
4. Bring deleted files back from the dead. When you delete a file from your PC or memory card, you're not wiping it off the actual hard drive. Instead, you're simply removing the index information that tells your PC where the file is, at which point the PC is free to treat the part of your disk that contain that file as empty space that it can write something else to. If you've accidentally deleted something, undelete utilities such as Recuva can help you find those files again as long as you haven't already written over that file with something new.
Don't leave your personal data on your old PC's hard drive.
5. Wipe your hard drive before getting rid of it. Because your PC doesn't immediately get rid of the files you delete, you can't just reformat your hard drive before recycling or selling your old computer--because someone might be able to use an undelete app to recover your sensitive data.
Want a totally worthless toolbar added to your browser? No? Then uncheck the box for that option before you install updates.
6. Uncheck the boxes before you install. Lots of helpful apps out there give you the option of installing search toolbars and other add-ons--and some of them are so pushy about being helpful that their installers are configured to install the uninvited extras unless you check a box saying you don't want them. Not only is each add-on another thing that your PC needs to load, but you have no idea what kind of data it could be sending out. They come bundled with the app because they make money for the app developer, not because they're particularly useful. So take a close look at what you're installing before you click Install--and in return, the installer won't change your search engine or install apps you don't need.
7. Beware of viruses living in Office docs. Experienced Microsoft Office users can take advantage of its built-in Visual Basic for Applications support to automate complex tasks with macros. However, malicious coders can use those same tools to design viruses that may interfere with your work and that of your colleagues. By default, Office is set to disable all macros and notify you when a doc you're reading contains them (to toggle this setting, in Word, select Word Options, Trust Center, Trust Center Settings, Macro Settings), so you should already be safe on this score.
8. Be skeptical of "cleaning" apps. Apps that make vague claims about improving your PC's performance and clearing out its clutter (Registry cleaners, I'm looking at you) will generally do more harm than good (if they do anything at all). To clean up your system, simply run Disk Cleanup (to reach it, select Start Menu, All programs, Accessories, System Tools); it comes with every Windows installation and it won't mess up your PC.
9. Uninstall your old apps. If you regularly download and install new apps from the Internet, you should get in the habit of pruning your collection every now and then. To do so, open the Programs and Features control panel, scroll through the list, and click Uninstall to ditch items you no longer want. You may need to take a trip into your C:/Program Files/ folder to hunt down a few additional unused apps. The less stuff you have on your PC, the less things are to go wrong.
10. Don't let a spilled drink ruin your laptop. If you keep your cool when a spill occurs, you may be able to prevent your data from disappearing and your motherboard from frying. Instead of panicking, quickly but methodically unplug the power cord and yank out the battery--don't wait for Windows to power off. Next, detach anything connected to the PC (network cables, USB devices) and pull out any readily removable components such as an optical drive. Tilt the laptop to try to drain the liquid in the direction that it spilled onto your PC, but be careful--you don't want to tilt the laptop in a direction that would allow the liquid to seep even deeper in. If you see liquid on the surface of the laptop, dab it off with a towel. At this point, unless you're comfortable disassembling your PC and cleaning it with electronics cleaner, you'll probably want to take it to a tech.
11. Turn down UAC. Both Windows 7 and Windows Vista include a security function called User Account Control, which dims the screen and flashes a dialog box whenever you install an app or change your system settings. Though this arrangement can be useful for catching sneaky apps that are trying to install or change things without your knowledge, it can also be annoying. If you use Vista, grab TweakUAC to make it less annoying without turning it off. If you use Windows 7, the default settings aren't too bad, but I recommend that you go into the User Accounts control panel, click User Account Control settings, and change the setting to the third notch down, so UAC will still warn you but it won't dim the screen.
12. Don't work in your admin account. Many PC users are accustomed to doing their everyday work while logged in to their PC's administrator account--especially in Windows XP. Doing so can save you the hassle of having to log in and out when you want to install apps or make changes, but it also leaves you much more vulnerable to viruses and malware--so don't do it.
The Control Panel is far easier to navigate when you can see all the icons at a glance.
13. Keep your Control Panel in Icon View. The Control Panel's Categories view can be useful if you're intimidated by the many different options available, but it can also make finding what you're looking for more difficult (especially if you're following detailed instructions that refer to the control panels by name). Click Classic view on the left (in Vista) or choose Large Icons from the View by dropdown menu in the upper right (in Windows 7), and you'll have ready access to all of the control panels.
Limit the clutter in your system tray by paring down the list of icons that occupy it.
14. Clear your system tray. Apps often park themselves in the system tray (the row of icons on the right side of your taskbar) and stay open without your realizing it. Take the time to clear it out occasionally. Open the Notification Area Icons control panel, and check the box on the bottom that says Always show all icons and notifications on the taskbar to get a sense of how cluttered your system tray is; then right-click each one you don't need and choose Close. Your RAM will thank you.
15. Manage your power settings. If you're using a laptop, you'll want to know how to change your power settings so your PC doesn't waste battery when you need to conserve it, doesn't slow down when you need to go fast, and doesn't go to sleep at an inopportune moment. Open the Power Options control panel, and choose from among several presets containing different configurations for when you're plugged in and when you're mobile--or feel free to create your own. To access the advanced settings, click Change plan settings, Change advanced settings; there you'll find detailed options related to your battery, Wi-Fi radio, graphics card, and more.
Think you know tech? If you don't have a handle on every single one of these 15 tech facts, habits, and efficiency tricks, you're not living up to your potential.
1. Don't double-click everything. Windows 101: Double-clicking is how you open items in Windows. It's not how you open links in your Web browser, click buttons in dialog boxes, or do pretty much anything else--and if you reflexively double-click, you might accidentally zip right past something important or submit a form twice. If you don't need this reminder yourself, chances are you know someone who does.
2. Use slashes and backslashes in the appropriate situations. Let's get it straight: / is a slash (or forward slash, if you must), and \ is a backslash. Backslashes are conventionally used for Windows file paths (C:\Program Files\Whatever), while slashes are used for Internet addresses.
3. Record the exact error message. When your PC crashes, it'll usually try to tell you why it is doing so--albeit with a string of numbers and letters that you won't understand. Write the message down in its entirety (or take a screenshot, if possible) so you can later plug it into Google or give it to your tech support agent. If your PC didn't provide an error message, go to Action Center (in the Control Panel) and see if it shows up under 'View archived messages' or 'View problems to report'.
4. Bring deleted files back from the dead. When you delete a file from your PC or memory card, you're not wiping it off the actual hard drive. Instead, you're simply removing the index information that tells your PC where the file is, at which point the PC is free to treat the part of your disk that contain that file as empty space that it can write something else to. If you've accidentally deleted something, undelete utilities such as Recuva can help you find those files again as long as you haven't already written over that file with something new.
Don't leave your personal data on your old PC's hard drive.
5. Wipe your hard drive before getting rid of it. Because your PC doesn't immediately get rid of the files you delete, you can't just reformat your hard drive before recycling or selling your old computer--because someone might be able to use an undelete app to recover your sensitive data.
Want a totally worthless toolbar added to your browser? No? Then uncheck the box for that option before you install updates.
6. Uncheck the boxes before you install. Lots of helpful apps out there give you the option of installing search toolbars and other add-ons--and some of them are so pushy about being helpful that their installers are configured to install the uninvited extras unless you check a box saying you don't want them. Not only is each add-on another thing that your PC needs to load, but you have no idea what kind of data it could be sending out. They come bundled with the app because they make money for the app developer, not because they're particularly useful. So take a close look at what you're installing before you click Install--and in return, the installer won't change your search engine or install apps you don't need.
7. Beware of viruses living in Office docs. Experienced Microsoft Office users can take advantage of its built-in Visual Basic for Applications support to automate complex tasks with macros. However, malicious coders can use those same tools to design viruses that may interfere with your work and that of your colleagues. By default, Office is set to disable all macros and notify you when a doc you're reading contains them (to toggle this setting, in Word, select Word Options, Trust Center, Trust Center Settings, Macro Settings), so you should already be safe on this score.
8. Be skeptical of "cleaning" apps. Apps that make vague claims about improving your PC's performance and clearing out its clutter (Registry cleaners, I'm looking at you) will generally do more harm than good (if they do anything at all). To clean up your system, simply run Disk Cleanup (to reach it, select Start Menu, All programs, Accessories, System Tools); it comes with every Windows installation and it won't mess up your PC.
9. Uninstall your old apps. If you regularly download and install new apps from the Internet, you should get in the habit of pruning your collection every now and then. To do so, open the Programs and Features control panel, scroll through the list, and click Uninstall to ditch items you no longer want. You may need to take a trip into your C:/Program Files/ folder to hunt down a few additional unused apps. The less stuff you have on your PC, the less things are to go wrong.
10. Don't let a spilled drink ruin your laptop. If you keep your cool when a spill occurs, you may be able to prevent your data from disappearing and your motherboard from frying. Instead of panicking, quickly but methodically unplug the power cord and yank out the battery--don't wait for Windows to power off. Next, detach anything connected to the PC (network cables, USB devices) and pull out any readily removable components such as an optical drive. Tilt the laptop to try to drain the liquid in the direction that it spilled onto your PC, but be careful--you don't want to tilt the laptop in a direction that would allow the liquid to seep even deeper in. If you see liquid on the surface of the laptop, dab it off with a towel. At this point, unless you're comfortable disassembling your PC and cleaning it with electronics cleaner, you'll probably want to take it to a tech.
11. Turn down UAC. Both Windows 7 and Windows Vista include a security function called User Account Control, which dims the screen and flashes a dialog box whenever you install an app or change your system settings. Though this arrangement can be useful for catching sneaky apps that are trying to install or change things without your knowledge, it can also be annoying. If you use Vista, grab TweakUAC to make it less annoying without turning it off. If you use Windows 7, the default settings aren't too bad, but I recommend that you go into the User Accounts control panel, click User Account Control settings, and change the setting to the third notch down, so UAC will still warn you but it won't dim the screen.
12. Don't work in your admin account. Many PC users are accustomed to doing their everyday work while logged in to their PC's administrator account--especially in Windows XP. Doing so can save you the hassle of having to log in and out when you want to install apps or make changes, but it also leaves you much more vulnerable to viruses and malware--so don't do it.
The Control Panel is far easier to navigate when you can see all the icons at a glance.
13. Keep your Control Panel in Icon View. The Control Panel's Categories view can be useful if you're intimidated by the many different options available, but it can also make finding what you're looking for more difficult (especially if you're following detailed instructions that refer to the control panels by name). Click Classic view on the left (in Vista) or choose Large Icons from the View by dropdown menu in the upper right (in Windows 7), and you'll have ready access to all of the control panels.
Limit the clutter in your system tray by paring down the list of icons that occupy it.
14. Clear your system tray. Apps often park themselves in the system tray (the row of icons on the right side of your taskbar) and stay open without your realizing it. Take the time to clear it out occasionally. Open the Notification Area Icons control panel, and check the box on the bottom that says Always show all icons and notifications on the taskbar to get a sense of how cluttered your system tray is; then right-click each one you don't need and choose Close. Your RAM will thank you.
15. Manage your power settings. If you're using a laptop, you'll want to know how to change your power settings so your PC doesn't waste battery when you need to conserve it, doesn't slow down when you need to go fast, and doesn't go to sleep at an inopportune moment. Open the Power Options control panel, and choose from among several presets containing different configurations for when you're plugged in and when you're mobile--or feel free to create your own. To access the advanced settings, click Change plan settings, Change advanced settings; there you'll find detailed options related to your battery, Wi-Fi radio, graphics card, and more.
How to Keep Your PC Safe With Sandboxing
Setting up your PC to run important apps in a sandbox can help you avoid malware infections.
Here's how to do it.
How to Keep Your PC Safe With Sandboxing. If viruses and malware are a regular problem for you, or if you're simply worried that your antivirus program isn't sufficient, you can add an extra layer of defense to your PC by setting up a sandboxing application. A properly sandboxed set of Windows programs can protect you from malware that your antivirus utilities miss, keeping your PC and your personal data more secure while you're shopping online, say, or visiting potentially dicey Web sites.
Sandboxing is a form of software virtualization that lets programs and processes run in its isolated virtual environment. Typically, programs running within the sandbox have limited access to your files and system, and they can make no permanent changes. That means that whatever happens in the sandbox stays in the sandbox.
You can find programs dedicated to sandboxing, but some antivirus programs also feature sandboxing; I'll explore both in this article. The exact sandboxing functionality varies between programs, but here are some of the common uses:
Automatically or manually run unknown programs in the sandbox in case they contain viruses, spyware, or other malware.
Run your Web browser within the sandbox to prevent damage from any infections you pick up while browsing, which is the most common origin of malware.
Run your browser within the sandbox to stop any existing malware on your computer from capturing your site login credentials or your online-shopping payment details.
Most sandboxing tools, such as the ones I'll discuss here, can run programs inside the sandbox right alongside your other programs in Windows. Generally speaking, programs running inside the sandbox will appear normal. But some tools load a separate environment, and have a different look and feel--and they may even require you to reboot the PC when you exit the sandbox.
Sandboxing in Comodo Internet Security
Sandboxing in Avast Antivirus
Sunday, October 16, 2011
Folder Lock Without Any Software
Folder Lock With Password Without Any Software-
Paste the code given below in notepad and 'Save' it as batch file (with extension '.bat').
Any name will do.
Then you see a batch file. Double click on this batch file to create a folder locker.
New folder named 'Locker' would be formed at the same location.
Now bring all the files you want to hide in the 'Locker' folder. Double click on the batch file to lock the folder namely 'Locker'.
If you want to unlock your files,double click the batch file again and you would be prompted for password.
Enter the password and enjoy access to the folder.
if EXIST "Control Panel.{21EC2020-3AEA-1069-A2DD-08002B30309D}" goto UNLOCK
if NOT EXIST Locker goto MDLOCKER
:CONFIRM
echo Are you sure u want to Lock the folder(Y/N)
set/p "cho=>"
if %cho%==Y goto LOCK
if %cho%==y goto LOCK
if %cho%==n goto END
if %cho%==N goto END
echo Invalid choice.
goto CONFIRM
:LOCK
ren Locker "Control Panel.{21EC2020-3AEA-1069-A2DD-08002B30309D}"
attrib +h +s "Control Panel.{21EC2020-3AEA-1069-A2DD-08002B30309D}"
echo Folder locked
goto End
:UNLOCK
echo Enter password to Unlock folder
set/p "pass=>"
if NOT %pass%==type your password here goto FAIL
attrib -h -s "Control Panel.{21EC2020-3AEA-1069-A2DD-08002B30309D}"
ren "Control Panel.{21EC2020-3AEA-1069-A2DD-08002B30309D}" Locker
echo Folder Unlocked successfully
goto End
:FAIL
echo Invalid password
goto end
:MDLOCKER
md Locker
echo Locker created successfully
goto End
:End
Paste the code given below in notepad and 'Save' it as batch file (with extension '.bat').
Any name will do.
Then you see a batch file. Double click on this batch file to create a folder locker.
New folder named 'Locker' would be formed at the same location.
Now bring all the files you want to hide in the 'Locker' folder. Double click on the batch file to lock the folder namely 'Locker'.
If you want to unlock your files,double click the batch file again and you would be prompted for password.
Enter the password and enjoy access to the folder.
if EXIST "Control Panel.{21EC2020-3AEA-1069-A2DD-08002B30309D}" goto UNLOCK
if NOT EXIST Locker goto MDLOCKER
:CONFIRM
echo Are you sure u want to Lock the folder(Y/N)
set/p "cho=>"
if %cho%==Y goto LOCK
if %cho%==y goto LOCK
if %cho%==n goto END
if %cho%==N goto END
echo Invalid choice.
goto CONFIRM
:LOCK
ren Locker "Control Panel.{21EC2020-3AEA-1069-A2DD-08002B30309D}"
attrib +h +s "Control Panel.{21EC2020-3AEA-1069-A2DD-08002B30309D}"
echo Folder locked
goto End
:UNLOCK
echo Enter password to Unlock folder
set/p "pass=>"
if NOT %pass%==type your password here goto FAIL
attrib -h -s "Control Panel.{21EC2020-3AEA-1069-A2DD-08002B30309D}"
ren "Control Panel.{21EC2020-3AEA-1069-A2DD-08002B30309D}" Locker
echo Folder Unlocked successfully
goto End
:FAIL
echo Invalid password
goto end
:MDLOCKER
md Locker
echo Locker created successfully
goto End
:End
Sunday, May 1, 2011
Environment variables in computer system
Useful Envoirment variables:-
%temp% - Opens user temporary folder
%username% - Points to currnet user logged in
%userprofile% - Points a user home path
%systemroot% - Opens windows root directory
%systemdrive% - Points to the drive on which OS is installed
%HOMEDRIVE% - C:
%HOMEPATH% - \Documents and Settings\<user name>
%ProgramFiles% - program files folder
Subscribe to:
Posts (Atom)